- HubPages»
- Arts and Design»
- Crafts & Handiwork»
- Jewelry Making
How To Make Jewelry: Make A Mixed Metal Wire Wrapped Bangle Bracelet

How To Make Handmade Wire Wrapped Jewellery
When I began making handmade jewelry two years ago, I had no idea that my hobby would eventually become my fulltime business and that I'd have two shops on Etsy, Naomi's Designs and MayaGirl Creations! But I now have a career that's fun and creative.
What's great about making jewelry is that it still feels like a hobby to me. I still love to design pieces and can get lost in time when making my creations. You, too, can experience this craft, as it's fairly easy and inexpensive to make beautiful things.
One of my best sellers are my mixed metal wire wrapped bangle bracelets. They're simple and elegant, but very chic, and the brass and silver wire look striking together. They're the type of jewelry piece that goes well with casual or fancy outfits and these bracelets also look good when several are worn at once, stacked together.
Making one only costs a few dollars and -- with practice -- doesn't take too much time. And they make great gifts! Because these bangle bracelets have such a simple design, they match almost anyone's taste or wardrobe. Imagine how impressed your friend or loved one will be when you present her with a gorgeous handmade bracelet for her birthday or a holiday.
As always, I recommend using inexpensive materials, namely artistic or craft wire, for starters. It does take some practice to make one of these wire bracelets, so don't get discouraged! Play around with the design and have fun!
Photo Instructions for Making A Wire Wrapped Bangle Bracelet


 that's perpendicular to the bracelet and the closed loop.")


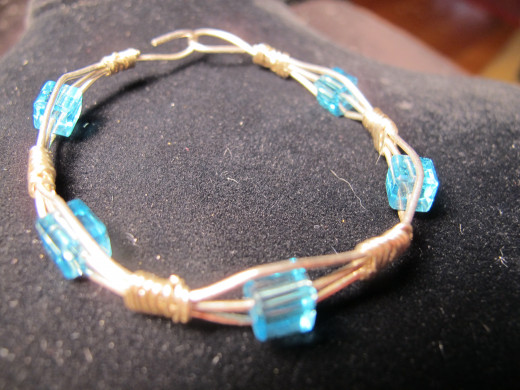

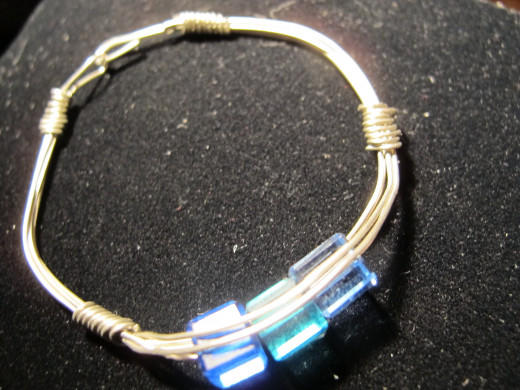
Make A Wire Wrapped Bangle Bracelet
Making a bangle bracelet from wire is actually pretty simple, though it does take some practice. The trick is to keep the wires from crossing and to make the wire wraps nice and tight. Here's what you'll need to get started:
MATERIALS:
1. 20 gauge brass wire: I recommend getting brass artistic wire, which you can purchase online or at a store like Michael's. I'm using brass plated copper wire, which is really inexpensive and easy to use. Though the wire feels soft, it gets pretty strong when you wrap it in the bundle for the bracelet.
2. 20 gauge silver plated artistic wire. Again, you can get this for only a few dollars online or at stores, and it's easy to work with. Once you get the hang of making bangle bracelets, you can upgrade to more expensive materials, like gold and silver -- though I like the "crafty" materials just fine!
3. Flat-nose pliers: These pliers have a flattened tip and are used to bend, straighten and crimp the wire. They're especially useful when making a wire wrapped bracelet because they will help you tighten the silver wire wraps.
4. Wire cutters: Their use is pretty obvious; you'll use them to cut the wire.
5. A ruler: I'll confess, I tend to eyeball a lot of my pieces, but when making a wire wrapped bracelet, it's important to measure out the pieces of wire and keep things even.
6. Round nose pliers: These wires have a rounded tip and are used to make curves. You won't need these much for this jewellery project, but they'll come in handy for making the bracelet's clasp, and can then be used for future projects.
7. Scotch tape (optional): Some people find that it's easier to tape the wires before wrapping them.
INSTRUCTIONS:
1. Cut five 9-inch pieces of the brass wire. These may seem long for a bracelet, but you're going to be trimming it down as you go along. Use your fingers and the flat-nose pliers to flatten and straighten the pieces as much as possible. The straighter the pieces of wire are, the easier they will be to work with. The end bracelet will be 6 1/2-7 inches after trimming the ends. If you have smaller wrists, you can start with smaller pieces of wire or trim more at the end to adjust.
2. Cut four 3-inch pieces of the silver plated wire. Again, straighten and flatten them. These are going to be the wire wraps for the bracelet.
3. Grab the brass wire pieces in a bundle, making sure that the ends line up evenly. Try to keep the pieces of wire from crossing. Now you're going to start wrapping them with the silver wire. For beginners, I suggest wrapping them with tape first: wrap the tape around the bundle about 3/4 from the end; then wrap the silver wire around the wires RIGHT UNDER (about an inch from the end) the tape.
4. Wrap the wire as tightly as possible, using the flat-nose wires to keep the wraps close together. Gently squeeze it to tighten the silver wire against the brass. Once you've secured this wrap, remove the tape, if you're using it.
5. Wrap a second silver wire about 1 1/2 inches below the first wrap. Again, keep the wires from crossing, and keep them tight and close, using the flat-nose pliers to securely crimp them into place. At this point, you can also start to gently curve the portion of the bracelet that's been wire wrapped so far. To do this, I just curve it against my wrist.
6. The next silver wire wrap is going to be about 3 inches from the last. That big gap is going to be the bottom of the bracelet. Do your best to line up this wire wrap so that it's even with the second wrap from the opposite side. Again, make the wrap nice and tight, and keep the wires from crossing. Continue to gently curve the bracelet.
7. Now it's time for the fourth and final wire wrap, which should be about 1 1/2 inches above the third -- and even with the first wrap on the opposite side. Adjust the wraps, if necessary, to get them even because it just looks nicer if they are. Continue to curve the bracelet around. At this point, there should be stray wires sticking out at both ends of the bracelet.
8. Start with one end and separate the five wires so that there are two on either side and one right in the middle. Trim the four wires on either side, cutting as close to the silver wrap as possible; use the flat-nose pliers to flatten them to the wrap, if necessary.
9. Go to the other side and again, separate out the five wires with two on either side and one in the middle. Again, cut the four wires on either side, as close to the wrap as possible, using the pliers to flatten them out.
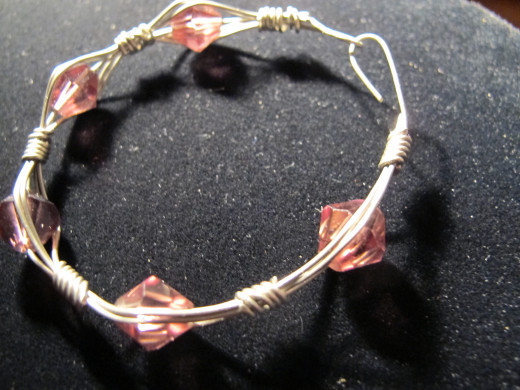
10. Go to one end of the bracelet, where the wire is sticking out. Here, you're going to make a closed loop for the clasp. Use the round-nose pliers to make a small loop, about a quarter inch around. Wrap the excess wire around the bottom of the loop two or three times (it'll look a bit like a noose). Cut the remaining wire and squeeze the wrap to make sure that the loop is securely closed. The loop should be on its side, in line with the bracelet when looking at it head on.
11. On the other end, you'll be making the hook portion of the clasp. Using the round-nose pliers, create an open loop (that looks a bit like a C). The hook should be PERPENDICULAR to the bracelet and loop. Trim any extra wire, as you don't want the hook to be too big. It should be close in size to the hook. The final bracelet should be about 6 1/2-7 inches.
12. Using the flat-nose pliers, gently squeeze each section of the bracelet to flatten out the wires, giving it more of a bangle look. And you're all set! The hook should easily slip into the loop and hold steady, and it's all ready to wear! Feel free to experiement with different types of wire combinations; you can make one that's all brass or silver, or one that's silver with brass wraps, one that's copper with silver wraps, etc. Use your imagination!
Useful Jewelry Making Links
- Naomi's Designs Handmade Jewelry Creations by Naomirabinowitz
Welcome! I sell handmade wire wrapped earrings, bracelets, wire wrapped necklaces, bridal jewelry. - MayaGirl Creations Handmade Jewelry For Kids by MayaGirlCreations
Welcome to MayaGirl Creations! I sell handmade wire wrapped, silver and enamel jewelry for children. - How To Begin Making Jewelry: Jewelry Making Basics
How to begin making jewelry? Here are jewelry making basics, including what tools and supplies to use. - How To Make Jewelry: Handmade Wire Jewelry
Making wire wrapped jewelry is a fun and useful skill. Here are tips on how to make jewelry and what tools are needed for wire wrapped earrings, wire wrapped necklaces and wire wrapped bracelets. - Jewelry Making Basics: How To Use A Jeweler's Saw
Knowing how to use a jeweler's saw is one of the most important techniqes in making jewelry. Here are tips on using a jeweler's saw. - How To Make Jewelry: Make A Handmade Wire Wrapped Ring For Kids -- Make Children's Jewelry
Making children's jewelry is a fun activity for adults and kids! Here are great patterns for wire wrapped coil rings for children. - How To Make Jewelry: Make A Handmade Wire Wrapped Stone Pendant
Making handmade jewelry is fun and easy! Here's a pattern for a wire wrapped stone pendant. - How To Make Jewelry: Make A Handmade Wire Wrapped Coil Ring
Making jewelry is fun and easy. Here's how to make a wire wrapped coil ring. - How To Make Jewelry: Make Handmade Wire Wrapped Spiral Earrings
Making jewelry is fun and easy! Here's an earring pattern for wire wrapped copper spiral earrings. - Wire Wrapped Jewelry Patterns: How To Make A Wire Wrapped Bracelet
Making jewelry is fun and easy. Here is a jewelry pattern for a wire wrapped bracelet. - How To Improve Sales On Etsy: Make More Sales With Your Etsy Shop
Looking for Etsy success? Here are some tips on how to improve sales on Etsy so you can sell more on Etsy. - Great Ways To Promote Your Etsy Shop And Make Money Selling On Etsy
Promoting your Etsy shop takes work but is worth the effort. Here are some great ways to promote your Etsy shop and make money selling on Etsy. - Tips For Selling At Craft Fairs And Shows: How To Sell At Craft Fairs
Selling at craft fairs, craft shows and festivals is a fun way to make money. Here are tips to increase sales at craft fairs. - How To Drive Traffic To Your Etsy Shop With A Blog
One great way to drive traffic to your Etsy site is to keep a blog. Here's how you can use a blog to make more sales on Etsy. - Fire Mountain Gems and Beads
America's favorite beads and beading supplies since 1973. Largest selection of beads and jewelry making supplies at wholesale prices. - Arts & Crafts | Michaels Stores
Michaels Stores, the largest specialty retailer of arts, crafts, framing, floral, wall décor, scrapbooking and much more.


